Cluster Deployment#
To build a local Kubernetes cluster, three main options are available: custom scripts (for manual deployment), Minikube, or kind. While automated tools hide much of the complexity, understanding manual deployment forces engineers to grasp the internal organization of the system. It is one of the most effective ways to transition from a user of the platform to a system engineer. This section outlines the trade-offs between these approaches.
Both Minikube and kind are suitable when you need to quickly evaluate or test a cluster with minimal configuration on a laptop.
Minikube: Maintained by the Kubernetes community, Minikube is a mature tool for local Kubernetes deployments. It primarily targets single-node clusters, but it also supports multi-node setups. It supports virtual machines or container runtimes.
kind: An official project of the Kubernetes Special Interest Group (SIG Testing). While Minikube supports both virtual machines or container runtimes, kind is designed to run Kubernetes nodes as containers (using Docker or Podman). This approach allows kind to run multi-node clusters in a containerized environment, typically starting significantly faster than VM-based setups.
Manually deploying a Kubernetes cluster provides the knowledge required to better understand the concepts presented in this book.
Architecture#
The script cluster_manager.sh is used to manually deploy a Kubernetes cluster.
It requires the configuration file cloud-init.yaml to automatically customize the virtual machines during the first boot.
The script automates the creation of a multi-node Kubernetes cluster on a local workstation or laptop.
The architecture consists of a single control plane node and a configurable number of worker nodes, all running Ubuntu virtual machines.
It uses Multipass as the underlying virtualization engine to provision the virtual machines.
cluster_deployment_architecture illustrates its main components.
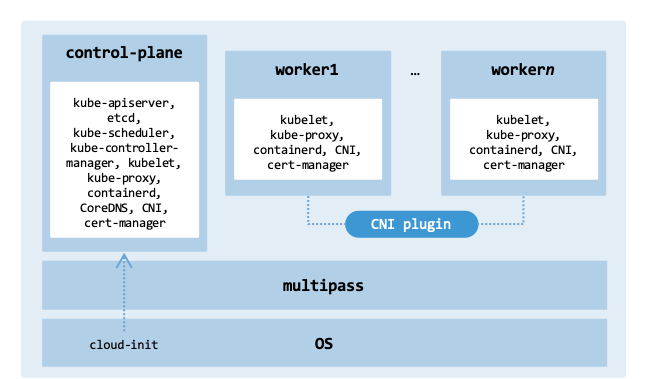
Architecture of the manually provisioned cluster.#
Multipass is the infrastructure provider, creating instances and applying initial configurations via cloud-init.
Once the instances are ready, the script bootstraps the Kubernetes control plane, installs a CNI plugin (supporting both Calico and Cilium), and deploys essential services like cert-manager using kubectl.
Execution logic#
The main() function serves as the central orchestrator. The execution begins with check_dependencies, a safety gate that verifies multipass, kubectl, and helm are installed. The script provisions the VM instances in parallel via Multipass and waits for their initial base configuration (cloud-init) to complete. While all VM instances are provisioned in parallel, the internal Kubernetes control plane is initialized first to generate the necessary join tokens before the worker nodes are attached to the cluster.
main() {
    check_dependencies

    if [[ $DELETE_MODE -eq 1 ]]; then
        delete_cluster
        exit 0
    fi

    log "Creating cluster ($NODE_COUNT nodes)"

    ALL_NODES=("$CP_NAME")
    for ((i=0; i < (NODE_COUNT - 1); i++)); do
        ALL_NODES+=("${WORKER_NAME}${i}")
    done

    for node in "${ALL_NODES[@]}"; do launch_vm "$node" & done
    wait
    for node in "${ALL_NODES[@]}"; do wait_for_vm_ready "$node" & done
    wait

    initialize_control_plane
    setup_network
    join_workers

    log "Cluster created."
    log "Run 'kubectl get nodes' to verify."
}
Once the VMs are ready, the Kubernetes cluster is deployed through three key functions:
initialize_control_plane: Sets up the control plane and retrieves the credentials needed for the host to communicate with the Kubernetes API.setup_network: Deploys the CNI (Calico or Cilium).join_workers: Uses the token generated by the control plane to attach the worker nodes to the cluster.
If the script is called with the -D flag, it runs delete_cluster to tear down the cluster.
Configuration#
The script uses optional flags to configure each node, including CPU cores, RAM, and disk space, while also selecting a CNI plugin.
Usage: ./cluster_manager.sh [OPTIONS]

Options:
-n <number>   Number of nodes total (default: 2)
-c <cpu>      CPU cores per node (default: 2)
-m <memory>   Memory per node (default: 2G)
-d <disk>     Disk size per node (default: 20G)
-t <network>  Network type: calico, cilium, none (default: calico)
-D            Delete/Destroy the existing cluster nodes
-h            Display this help message

Example:
./cluster_manager.sh -n 3 -c 4 -m 4G
Most variables are self-explanatory and defined directly in the script.
# Default configuration for nodes
NODE_COUNT="2"
OS="lts" # Ubuntu LTS
MEMORY="2G"
CPU="2"
DISK="20G"
CLOUD_INIT="cloud-init.yaml"

# Cluster
CP_NAME="control-plane"
WORKER_NAME="worker"
CALICO_VERSION="v3.26.0"
CILIUM_VERSION="1.14.0"
CERT_MANAGER_VERSION="v1.8.0"
KUBECONFIG="kubeconfig.yaml"

# CNI networking
NETWORK="calico" # Options: calico, cilium, none
POD_CIDR="10.244.0.0/16"
We clarify the objective of the primary deployment variables (including OS, CLOUD_INIT, WORKER_NAME, KUBECONFIG, NETWORK, and POD_CIDR):
OSspecifies the operating system used to build the virtual machines. You can run the multipass find command to list the available cloud images that can be launched as virtual machines.CLOUD_INITpoints to the YAML configuration file used by cloud-init to initialize instances.WORKER_NAMEdefines the string prefix for worker nodes. The script automatically appends a zero-indexed sequential number directly to this prefix (e.g., worker0, worker1).CALICO_VERSION,CILIUM_VERSION, andCERT_MANAGER_VERSIONspecify the exact release versions of the CNI and cert-manager manifests deployed during initialization.KUBECONFIGdefines the filename (defaulting to kubeconfig.yaml) used to store cluster credentials. Tools like kubectl use this file to authenticate and manage the cluster.NETWORKselects the CNI plugin to use to create the network connecting the Pods. Supported options are calico, cilium, and none.POD_CIDRspecifies the IP address range for the Pod network. The default is 10.244.0.0/16, which is a standard default CIDR block widely used in Kubernetes networking.
Virtual machines#
There are two functions to handle the provisioning of virtual machines.
The launch_vm() function creates a virtual machine based on the configuration variables, passing CPU, memory, and disk parameters directly to the Multipass CLI, and attaching the cloud-init file.
launch_vm() {
    local vm_name=$1
    log "Launching VM: $vm_name ($CPU cores, $MEMORY RAM, $DISK Disk)."

    if multipass info "$vm_name" &>/dev/null; then
        log "VM $vm_name already exists. Skipping launch."
    else
        multipass launch -n "$vm_name" --cloud-init="$CLOUD_INIT" \
            -c "$CPU" -m "$MEMORY" --disk "$DISK" "$OS"
    fi
}

wait_for_vm_ready() {
    local vm_name=$1
    log "Waiting for SSH on $vm_name..."
    run_command "$vm_name" "echo SSH_READY"

    log "Waiting for cloud-init on $vm_name..."
    run_command "$vm_name" "cloud-init status --wait"

    log "Verifying Containerd on $vm_name..."
    run_command "$vm_name" "ls /var/run/containerd/containerd.sock"

    log "VM $vm_name is ready."
}
Since instance provisioning and user-data initialization occur asynchronously inside the instance after boot, the wait_for_vm_ready() function performs specific checks (SSH, cloud-init, and containerd checks) to ensure the VMs are ready for Kubernetes.
Each VM is created using the –cloud-init option to configure SSH, users, software, networking, and run specific commands during instance boot. This is where the operating system is configured for Kubernetes. The default configuration file is named cloud-init.yaml.
#cloud-config
users:
  - name: ubuntu
    sudo: ALL=(ALL) NOPASSWD:ALL
    ssh_authorized_keys:
      - ssh-ed25519 AAAAC3NzaC1lZDI1NTE5AAAAIEAnpx4n6sAKY9hRJ7E46M378BjjyONqLRdiB1FAJc1X jcardoso@hwlaptop

package_update: true
package_upgrade: true

# Installed via package manager to handle dependencies automatically
packages:
  - curl
  - python3
  - python3-pip
  - python3.12-venv

write_files:
  # Kernel modules for Kubernetes networking
  - path: /etc/modules-load.d/k8s.conf
    content: |
      overlay
      br_netfilter

  # Sysctl params required by setup, params persist across reboots
  - path: /etc/sysctl.d/k8s.conf
    content: |
      net.bridge.bridge-nf-call-iptables  = 1
      net.bridge.bridge-nf-call-ip6tables = 1
      net.ipv4.ip_forward = 1

runcmd:
  # Disable swap (Kubelet requirement)
  - swapoff -a
  - sed -i '/ swap / s/^\(.*\)$/#\1/g' /etc/fstab

  # Load modules
  - modprobe overlay
  - modprobe br_netfilter
  - sysctl --system

  # Prepare repositories
  - mkdir -p -m 755 /etc/apt/keyrings

  # Containerd
  - curl -fsSL https://download.docker.com/linux/ubuntu/gpg \
      | gpg --dearmor -o /etc/apt/trusted.gpg.d/docker.gpg
  - add-apt-repository "deb [arch=amd64] https://download.docker.com/linux/ubuntu $(lsb_release -cs) stable" -y

  # Kubernetes
  - echo "deb [signed-by=/etc/apt/keyrings/kubernetes-apt-keyring.gpg] https://pkgs.k8s.io/core:/stable:/v1.35/deb/ /" \
      | sudo tee /etc/apt/sources.list.d/kubernetes.list
  - curl -fsSL https://pkgs.k8s.io/core:/stable:/v1.35/deb/Release.key \
      | sudo gpg --dearmor -o /etc/apt/keyrings/kubernetes-apt-keyring.gpg
  - apt-get update

  # Install and configure containerd
  - apt-get install -y containerd.io
  - mkdir -p /etc/containerd
  - containerd config default | tee /etc/containerd/config.toml
  - sed -i 's/SystemdCgroup \= false/SystemdCgroup \= true/g' /etc/containerd/config.toml
  - systemctl restart containerd
  - systemctl enable containerd

  # Install Kubernetes
  - apt-get install -y kubelet kubeadm kubectl
  - apt-mark hold kubelet kubeadm kubectl

power_state:
  delay: now
  mode: reboot
  condition: true
The cloud-init configuration executes the following main actions:
users: Defines which user accounts should be created or modified. Adds a user named ubuntu (if it does not exist) with administrative privileges. Adds ssh_authorized_keys to set up SSH access to the virtual machines without using a password.package_update/package_upgrade: Updates the package index and upgrades all installed packages to the latest versions.packages: Installs required software dependencies and runtime packages needed for the node.write_files: Creates and modifies files. It updates the file /etc/modules-load.d/k8s.conf to ensure that the kernel modules overlay and br_netfilter are loaded to support container filesystems and network traffic filtering. It prepares the file /etc/sysctl.d/k8s.conf to support Kubernetes networking. For example, net.bridge.bridge-nf-call-iptables = 1 ensures that IPv4 traffic is processed by iptables on bridge interfaces and net.ipv4.ip_forward = 1 enables IP forwarding to forward packets between network interfaces.runcmd: Executes shell commands in order during the first boot.power_state: Automates a system reboot once the initialization completes.
The cloud-init.yaml template targets a specific Kubernetes repository version (v1.35). Ensure this matches your target cluster version deployment.
Control plane#
The initialize_control_plane() function initializes Kubernetes on the control plane node using kubeadm init with the –pod-network-cidr.
This initialization step generates the Certificate Authority (CA) and certificates for all cluster components, deploys Pods for the API Server, Scheduler, and Controller Manager, and sets up the etcd database.
The function also configures the ubuntu user to administer the cluster.
initialize_control_plane() {
    log "Initializing Kubernetes on Control Plane."
    run_command "$CP_NAME" "sudo kubeadm init --pod-network-cidr=$POD_CIDR"

    run_command "$CP_NAME" \
        "mkdir -p /home/ubuntu/.kube && \
        sudo cp /etc/kubernetes/admin.conf /home/ubuntu/.kube/config && \
        sudo chown ubuntu:ubuntu /home/ubuntu/.kube/config"

    log "Transferring kubeconfig to local host."
    mkdir -p ~/.kube/
    multipass transfer "$CP_NAME":/home/ubuntu/.kube/config config
    mv config "$HOME/.kube/config"
    log "Cluster access configured at ~/.kube/config"

    until kubectl cluster-info &>/dev/null; do
        log "Waiting for local access to Kubernetes API Server..."
        sleep 2
    done

    log "Installing cert-manager ($CERT_MANAGER_VERSION)..."
    local cert_url="https://github.com/cert-manager/cert-manager/releases/download"
    kubectl apply -f "${cert_url}/${CERT_MANAGER_VERSION}/cert-manager.yaml"
}
Afterwards, the script copies the generated credentials from /etc/kubernetes/admin.conf to the user’s home directory at ~/.kube/config. This enables the ubuntu user to run kubectl commands. Finally, the script transfers this configuration file to your host machine’s ~/.kube/config directory, enabling cluster administration from your local terminal. This file contains credentials and cluster information used by kubectl to interact with the Kubernetes API server. Once the API server is reachable, the function installs the cert-manager to automate the generation and renewal of TLS certificates.
During provisioning you will see the following message which contains information about the cluster created.
Your Kubernetes control-plane has initialized successfully!

To start using your cluster, you need to run the following as a regular user:

mkdir -p $HOME/.kube
sudo cp -i /etc/kubernetes/admin.conf $HOME/.kube/config
sudo chown $(id -u):$(id -g) $HOME/.kube/config

Alternatively, if you are the root user, you can run:

export KUBECONFIG=/etc/kubernetes/admin.conf

You should now deploy a pod network to the cluster.
Run "kubectl apply -f [podnetwork].yaml" with one of the options listed at:
https://kubernetes.io/docs/concepts/cluster-administration/addons/

Then you can join any number of worker nodes by running the following on each as root:

kubeadm join 10.30.45.110:6443 --token b195sw.f1x9wfzm58sag5xr \
      --discovery-token-ca-cert-hash sha256:78b04c7b040f4d90043e497afd2188cd322cc9a65d2e3df4e8b4c85758ee8342
Networking#
The setup_network() function sets up networking based on the selected CNI plugin.
It can be extended to support additional network plugins.
setup_network() {
    log "Setting up CNI: $NETWORK"
    case $NETWORK in
        "calico")
            local CALICO_URL="https://raw.githubusercontent.com/projectcalico/calico"
            local MANIFEST_PATH="${CALICO_VERSION}/manifests/calico.yaml"
            kubectl apply -f "${CALICO_URL}/${MANIFEST_PATH}"
            ;;
        "cilium")
            helm repo add cilium https://helm.cilium.io/
            helm repo update
            helm install cilium cilium/cilium --version "${CILIUM_VERSION}" \
               --namespace kube-system \
               --set prometheus.enabled=true \
               --set hubble.enabled=true \
               --set hubble.metrics.enableOpenMetrics=true \
               --set hubble.relay.enabled=true \
               --set hubble.ui.enabled=true
            ;;
        "none") log "Skipping CNI installation." ;;
        *) err "Unknown network type: $NETWORK" ;;
    esac
}
It supports the following network plugins:
calico: Supports iptables, unencapsulated BGP routing, and VXLAN modes. While it can be configured for unencapsulated native routing to avoid overhead, it defaults to VXLAN or IP-in-IP encapsulation in many standard installation manifests to ensure cross-subnet compatibility.cilium: Uses eBPF (discussed in Network Observability) to process packets programmatically without relying on iptables. Supports direct routing, tunneling (VXLAN/Geneve), and a kube-proxy replacement.
The function includes a “none” option for users who prefer to manage networking manually.
The script deploys Calico using the standard monolithic manifest (calico.yaml) for simplicity in development environments, rather than using the Tigera Operator.
Worker nodes#
The join_workers() function joins new worker nodes to the cluster.
join_workers() {
    log "Generating join token from $CP_NAME..."
    local join_command
    join_command=$(multipass exec "$CP_NAME" -- \
        sudo kubeadm token create --print-join-command)

    local worker_count=$((NODE_COUNT - 1))
    if [ "$worker_count" -le 0 ]; then
        log "No worker nodes to join."
        return 0
    fi
    for ((i=0; i<worker_count; i++)); do
        local node_name="${WORKER_NAME}${i}"
        log "Joining $node_name to cluster..."
        run_command "$node_name" "sudo ${join_command}"

        log "Configuring kubectl access on $node_name..."
        run_command "$node_name" "mkdir -p /home/ubuntu/.kube"
        # When Multipass is installed as a Snap package, it is sandboxed
        # Thus, many directories are isolated
        cat "$HOME/.kube/config" | \
             multipass exec "$node_name" -- bash -c "cat > /home/ubuntu/.kube/config"
        run_command "$node_name" "sudo chown ubuntu:ubuntu /home/ubuntu/.kube/config"

        sleep 1
        kubectl label nodes "$node_name" \
            node-role.kubernetes.io/worker=worker --overwrite
    done
}
The function begins by generating a bootstrap join command from the control plane node, which is similar to the following:
kubeadm join 10.30.45.110:6443 --token b195sw.f1x9wfzm58sag5xr \
   --discovery-token-ca-cert-hash sha256:78b04c7b040f4d9004...
The script iterates through the workers and executes the join_command on each node. Since by default, kubeadm joins nodes without specific node role, the final step is applying a label using kubectl label to apply the node-role.kubernetes.io/worker=worker label to each new node.
Operations#
This section describes the day-2 procedures required to operate and troubleshoot a Kubernetes cluster running on Multipass-based infrastructure. It is structured to analyze the architecture top-down: from the host virtual machine layer, down to the Kubernetes node runtime, and finally to individual Pod workloads. The commands and checks focus on observability, connectivity, and recovery to assess the system state and identify failures.
Infrastructure#
Networking: To view the active Multipass instances and their assigned IP addresses, run the following command:
$ multipass list

Name              State             IPv4             Image
control-plane     Running           10.30.45.150     Ubuntu 24.04 LTS
                                    10.244.235.128
worker0           Running           10.30.45.116     Ubuntu 24.04 LTS
                                    10.244.204.64
worker1           Running           10.30.45.90      Ubuntu 24.04 LTS
                                    10.244.235.192
This command shows the instance name, status, IP addresses, and the operating system image. The output lists multiple IPv4 addresses per instance, serving different networking roles:
Primary IP (e.g., 10.30.45.x): This is the bridge address assigned by Multipass. It is used for host-to-VM communication, such as SSH access.
Secondary IP (e.g., 10.244.x.x): The IP range
10.244.0.0/16is the default Pod CIDR used by many CNI plugins such as Flannel and Calico. It represents the logical overlay network assigned inside the cluster for individual Pods.
If an instance does not have a primary IPv4 address, it likely failed to lease an IP from the hypervisor’s DHCP server.
If a soft reboot using multipass restart <instance-name> fails to resolve the lease, cycle the instance power state using multipass stop <instance-name> followed by multipass start <instance-name>.
Connectivity: If instances are running but cannot reach each other, verify the network path between the host and the nodes, as well as between the nodes themselves.
$ ping -c 3 10.30.45.150
$ multipass exec worker0 -- ping -c 3 10.30.45.150
If pings fail, check firewalls, VPNs, and subnet conflicts.
Access:
The most common method to access a Multipass instance is the multipass shell <instance-name> command.
This automatically logs you into the instance as the default user (ubuntu) without requiring a password.
$ multipass shell control-plane
Alternatively, you can use: ssh ubuntu@<NODE_IP> (requires your SSH public key to be injected during instance provisioning via cloud-init).
Teardown:
Multipass uses a two-stage deletion process: delete (marking for removal) and purge (permanent disk cleanup).
First, identify the names of the instances to remove (e.g., control-plane and worker0) using the command multipass list.
Delete each instance using multipass delete.
Finally, to permanently remove the instances from disk, run multipass purge.
$ multipass list
$ multipass delete control-plane worker0 worker1
$ multipass purge
To delete and permanently remove all instances in a single step, use multipass delete --all --purge.
The multipass purge command cleans up all deleted instances globally on the host. Ensure no other paused or already-deleted instances remain before running it.
This action is irreversible.
Cluster#
Node status:
The health of the cluster depends on the control plane successfully communicating with the kubelet on each node.
A Ready status confirms that the node is healthy and capable of running Pods.
In our setup, you should have one control-plane node and NODE_COUNT - 1 worker nodes.
The roles assigned are control-plane and worker.
Use the following command to get an overview of the cluster state:
$ kubectl get nodes

NAME            STATUS   ROLES           AGE   VERSION
control-plane   Ready    control-plane   85s   v1.35.0
worker0         Ready    worker          70s   v1.35.0
worker1         Ready    worker          67s   v1.35.0
If a node is marked NotReady, use the describe command to generate a diagnostic report:
$ kubectl describe node <node-name>
When reviewing the report, prioritize these four areas to identify issues:
Conditions: Ensure
MemoryPressure,DiskPressure, andPIDPressureare set to False.Capacity: Compare
CapacitywithAllocatableto see how much overhead the system is consuming.Taints: Look for
NoScheduleorNoExecutetaints that prevent Pods from landing on the node.Events: Check the
Eventslog for recent lifecycle errors or heartbeat failures.
Control Plane:
Ensure the control plane components and the networking layer (CNI) are in a Running state.
Run the following command to inspect all system-level Pods across all namespaces.
$ kubectl get pods --all-namespaces

...  NAME                                       READY   STATUS   ...
     cert-manager-7b767f647-qbwll               1/1     Running
     cert-manager-cainjector-548d6bf4bb-95fmx   1/1     Running
     cert-manager-webhook-7754b7ffcf-q8nhf      1/1     Running
     calico-kube-controllers-69fb6cc57b-fvkgp   1/1     Running
     calico-node-2wbxf                          1/1     Running
     calico-node-6xbnl                          1/1     Running
     calico-node-fwcjh                          1/1     Running
     coredns-7d764666f9-4m8td                   1/1     Running
     coredns-7d764666f9-4ztlb                   1/1     Running
     etcd-control-plane                         1/1     Running
     kube-apiserver-control-plane               1/1     Running
     kube-controller-manager-control-plane      1/1     Running
     kube-proxy-4pklf                           1/1     Running
     kube-proxy-hlbzw                           1/1     Running
     kube-proxy-vgrxx                           1/1     Running
     kube-scheduler-control-plane               1/1     Running
When reviewing the list, ensure that all core control plane components (kube-apiserver, kube-controller-manager, kube-scheduler, etcd), node utilities (kube-proxy, coredns, CNI Pods), and key infrastructure add-ons (such as cert-manager) are running.
API Endpoints: You can query the API server’s health checks directly. These endpoints provide a verbose breakdown of every subsystem, allowing you to pinpoint exactly which component (like etcd) is failing.
$ kubectl get --raw='/livez?verbose'
$ kubectl get --raw='/readyz?verbose'

[+]ping ok
[+]log ok
[+]etcd ok
[+]etcd-readiness ok
[+]informer-sync ok
...
[+]shutdown ok
readyz check passed
The endpoint /livez determines if the process is alive, while /readyz checks if the server is ready to handle traffic.
Events:
Kubernetes Events provide a log of state changes, errors, and system decisions.
Always inspect recent cluster events when diagnosing issues.
Run the following command to display all events (use the flag --watch to watch live events):
kubectl get events --all-namespaces \
      --sort-by=.metadata.creationTimestamp

...
default   9m34s   Normal    Pulled       pod/dns-test   Successfully pulled image "busybox" in 1.038s (1.038s including waiting). Image size: 2224358 bytes.
default   8m52s   Warning   BackOff      pod/dns-test   Back-off restarting failed container dns-test in pod dns-test_default(9e064650-085d-431e-aa4b-49eeae941f42)
default   9m20s   Normal    Pulled       pod/dns-test   Successfully pulled image "busybox" in 1.309s (1.309s including waiting). Image size: 2224358 bytes.
default   8m53s   Normal    Pulled       pod/dns-test   Successfully pulled image "busybox" in 1.243s (1.243s including waiting). Image size: 2224358 bytes.
default   5m39s   Normal    Scheduled    pod/dns-test   Successfully assigned default/dns-test to worker0
default   5m39s   Normal    Pulling      pod/dns-test   Pulling image
...
Warning events, such as FailedScheduling, ErrImagePull, BackOff, and NodeNotReady require immediate attention.
Networking:
Once the nodes are Ready, ensure that Pods can find each other via DNS and communicate across the virtual network.
CoreDNS maps service names to IP addresses.
If it fails, applications will be unable to find databases or other internal services.
kubectl run dns-test \
   --rm -it \
   --restart=Never \
   --image=registry.k8s.io/e2e-test-images/jessie-dnsutils:1.3 \
   -- nslookup kubernetes.default

Server:         10.96.0.10
Address:        10.96.0.10#53

Name:   kubernetes.default.svc.cluster.local
Address: 10.96.0.1

pod "dns-test" deleted
The Server IP (e.g., 10.96.0.10) should match the kube-dns service IP.
The Name should resolve to the ClusterIP of the Kubernetes API (e.g., 10.96.0.1).
Ensure the CNI network agents are running on every node:
$ kubectl get pods -n kube-system -o wide | grep -E 'calico|cilium'

calico-kube-controllers-69fb6cc57b-fvkgp   1/1  Running   0   20m   10.244.235.131   control-plane   ...
calico-node-2wbxf                          1/1  Running   0   20m   10.30.45.116     worker0         ...
calico-node-6xbnl                          1/1  Running   0   20m   10.30.45.150     control-plane   ...
calico-node-fwcjh                          1/1  Running   0   19m   10.30.45.90      worker1         ...
If CNI Pods are in a Pending state, the CNI plugin was not initialized.
Restart: If the control plane is unresponsive or requires a configuration update, run this command inside the control plane node:
$ sudo systemctl restart kubelet
Pods#
Placement:
By default, kubectl get pods omits their physical location.
Using the -o wide flag allows you to see which nodes are hosting each Pod.
Run the following command to see the mapping of Pods to nodes:
$ kubectl get pods -o wide --all-namespaces

NAME          READY   STATUS    IP               NODE      ...
nginx-web     1/1     Running   10.30.45.116     worker0
api-service   1/1     Running   10.244.235.193   worker1
db-primary    1/1     Running   10.244.235.194   worker1
Make sure the Pods are distributed across the worker nodes (worker0, worker1, etc.). If all Pods are assigned to only a few nodes, the cluster may have a scheduling or taint issue.
Diagnostics:
When a Pod is in a Pending or CrashLoopBackOff state, use the describe command:
$ kubectl describe pod <pod-name>
When reviewing the output, look for the status (Initialized, Ready), container state (Waiting, Terminated), the restart count, and the events log.
Logs: If a Pod contains multiple containers, specify the container name:
$ kubectl logs <pod-name> -c <container-name>
To watch logs as they happen (similar to tail -f), use the flag -f.
If a Pod crashed and was restarted, the logs command will only show the new container’s output.
To see the logs of a failed or crashed container instance from a previous lifecycle run, append the --previous flag.
Events: Use the same commands described previously for the operation of the cluster to verify logs show no recurring errors.
Connectivity: To verify East-West traffic (communication within the cluster and between nodes), run a simple Pod and check its connectivity to other nodes:
kubectl run ew-test \
   --rm -it \
   --restart=Never \
   --image=registry.k8s.io/e2e-test-images/jessie-dnsutils:1.3 \
   -- bash
Inside the Pod, test Pod-to-Pod or Pod-to-Node connectivity:
$ ping <pod-ip>
$ ping <node-ip>
Ping a Pod that is located on a different node than the ew-test Pod. This confirms that CNI connectivity (e.g., VXLAN) is working. You can also test nslookup (CoreDNS) and wget/curl (kube-proxy).
Commands:
Use the kubectl exec command to run commands inside a container to inspect a container’s filesystem, environment variables, or processes.
To open an interactive terminal (e.g., bash), use the -it flags.
If the Pod contains more than one container, specify the container to access using the -c flag.
$ kubectl exec -it <pod-name> -c <container-name> -- bash
To execute a single command and have the output returned immediately, omit the -it flags.
Restarting: In Kubernetes, a Pod is ephemeral. If it is backed by a workload controller (such as a Deployment or ReplicaSet), deleting the Pod forces the controller to automatically provision a healthy replacement. If the Pod was created standalone without a controller, deleting it will remove it permanently.
$ kubectl delete pod <pod-name> -n <namespace>
For Deployments, perform a rollout restart. This ensures zero downtime by starting a new Pod before terminating the old one.
$ kubectl rollout restart deployment/<deployment-name>