Appendix#
Docker networking#
As already mentioned, historically, when Kubernetes was announced in 2014, Docker was the preferred containerization environment. Docker was simple and had a vast toolset for building, packaging, and running containers. As Kubernetes evolved, it introduced the Container Runtime Interface (CRI) in 2016 to decouple Kubernetes from a specific runtime engine. Two popular runtimes subsequently emerged: containerd and CRI-O. In 2020, Kubernetes announced the deprecation of Docker as the default runtime through the removal of Dockershim, a component that translated Kubernetes CRI calls into the Docker API.
Architecture#
A Docker environment consists of three main components: Docker client, Docker host, and Docker registry.
Each component has specific responsibilities, as illustrated in docker_architecture_single_host:
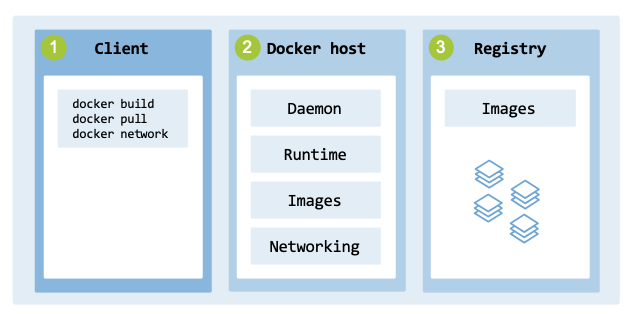
Docker architecture (single host).#
Docker client: The Docker CLI interacts with the Docker daemon via a REST API or a Unix socket to issue commands such as
docker network createanddocker run.Docker host: The machine running the core environment, which includes:
Daemon: The daemon named dockerd runs on the host and manages images, containers, networks, and volumes.
Runtime: Responsible for creating and running containers from images.
Images: Contain the code and libraries that form the application.
Networking: Provides networking capabilities to connect containers to each other and to external networks.
Docker registry: Stores Docker images. Docker Hub (hub.docker.com) is the default image registry.
The client is the interface used to send API requests to the daemon. The daemon processes instructions, managing high-level resources and instructing the underlying container runtime to create and run containers from images. It configures the underlying operating system to set up networking. Images are pulled from the registry when required.
Operation#
The CLI tool for Docker is the docker command.
docker-commands categorized into container, image, volume, and network subsystems.
Plane |
Command |
Description |
|---|---|---|
Network |
create |
Create a new custom network. |
inspect |
Display information about one or more networks. |
|
connect |
Connect a container to a specific network. |
|
ls, rm |
List or remove networks. |
|
Container |
run |
Create and start a container from an image. For example, docker run -it ubuntu bash. |
exec |
Execute a command inside a running container. For example, docker exec -it <container_id> bash. |
|
ps, stop, rm |
List, stop, or remove containers. |
|
logs |
View a container’s logs. |
|
Image |
pull |
Retrieve an image from a registry (e.g., Docker Hub). |
images, rmi |
List or remove local images. |
|
Volume |
volume |
Manage data volumes. |
The following section explores the various options of the command docker network create to create custom networks that isolate containers from others.
$ docker network create [OPTIONS] NETWORK
Although the command supports more than 15 options, the main ones are:
–driver DRIVER: The network driver to use (e.g., host or bridge).
–subnet=SUBNET: Defines a custom subnet (e.g., 192.168.5.0/24). Docker automatically assigns a subnet (e.g., 172.17.0.0/16) if not specified.
–gateway=GATEWAY: The custom gateway for the subnet (by default, the gateway address is the first IP in the subnet).
–ip-range=IP_RANGE: Allocates a range of IP addresses from the subnet. Useful when IP addresses are already in use elsewhere.
Networking#
Docker has its own native networking stack, implemented as part of the Docker Engine. The most common Docker network types are:
host: Shares the host network namespace and IP stack.
bridge: Creates a private network that is isolated and internal to the host.
overlay: Creates distributed networks that span across multiple hosts.
macvlan: Assigns containers unique IPs on the host network.
none: Disables network connectivity for a container.
Docker creates three default networks during installation: host, bridge, and none.
$ sudo docker network ls

NETWORK ID     NAME         DRIVER    SCOPE
ecf7df090132   bridge       bridge    local
6d85dccf9c54   host         host      local
e4f6f016df8b   none         null      local
In the host network mode, containers share the IP address and network namespace of the host. In other words, the container shares the host IP address. Processes running inside the container have the same network features as the host’s services. While the container’s network stack is mapped to the host’s network stack, this removes network isolation from the host.
To verify that a container assigned to a network of type host indeed uses the same network stack as the underlying host, execute the following two commands:
$ docker run --rm --network=host busybox ip addr
<output>

$ ip addr
<output>
The first command runs a container using the BusyBox image and executes the ip addr command inside the container to display the network interfaces and their assigned IP addresses. The second command executes ip addr on the host. Both commands display exactly the same <output>:
Note
The BusyBox image is a lightweight Docker image that provides a set of Unix utilities.
1: lo: <LOOPBACK,UP,LOWER_UP> mtu 65536 qdisc noqueue qlen 1000
...
2: enp2s0: <BROADCAST,MULTICAST,UP,LOWER_UP> mtu 1500 qdisc fq_codel qlen 1000
    link/ether 48:9e:bd:9c:55:a5 brd ff:ff:ff:ff:ff:ff
    inet 192.168.5.127/24 brd 192.168.5.255 scope global dynamic
       noprefixroute enp2s0
       valid_lft 142862sec preferred_lft 142862sec
    inet6 fe80::63bb:19f9:e86b:bc0b/64 scope link noprefixroute
       valid_lft forever preferred_lft forever
...
A host network type is often used when high performance is required since it does not account for the overhead of a virtual network bridge and NAT. When using a bridge, its private IP addresses are not visible or routable outside the host machine. To access external networks, private addresses are translated into the host machine’s routable IP address using NAT and IP masquerading. Other use cases for the use of host networks include situations when monitoring tools (e.g., Prometheus or network analyzers) listen on host interfaces or VPN software that binds directly to host interfaces.
A bridge network type is a virtual bridge network created to provide a private network for containers. When a bridge network is created, Docker assigns a private IP subnet to the bridge network, which is used to assign IP addresses to the containers. Since IP addresses come from the same range, containers on the same host can communicate. Nonetheless, containers on different hosts cannot communicate directly. If not specified, Docker automatically selects an available pool from a set of predefined blocks within the standard private IP ranges (such as 172.17.0.0/16 for the default bridge) defined by RFC 1918.
The bridge itself is also assigned an IP address and default gateway, which is used to route traffic to external networks. To enable container communication with external networks, Docker enables IP forwarding on the host system to allow traffic to flow between different network interfaces. This involves IP masquerading, which configures iptables rules for NAT to translate the source IP address of containers to the host machine’s IP address.
When Docker starts, the daemon creates a default bridge on the host machine named docker0. When a container is created without specifying a network, it is connected to the docker0 bridge:
$ ip addr show docker0
7: docker0: <NO-CARRIER,BROADCAST,MULTICAST,UP> mtu 1500 qdisc
      noqueue state DOWN group default
    link/ether 02:42:b3:20:e3:89 brd ff:ff:ff:ff:ff:ff
    inet 172.17.0.1/16 brd 172.17.255.255 scope global docker0
        valid_lft forever preferred_lft forever
    inet6 fe80::42:b3ff:fe20:e389/64 scope link
        valid_lft forever preferred_lft forever
Starting a container using the default bridge network assigns the container to the docker0 bridge:
$ docker run --rm --network=bridge busybox ip addr

...
6: eth0@if7: <BROADCAST,MULTICAST,UP,LOWER_UP,M-DOWN> mtu 1500 qdisc noqueue
    link/ether 02:42:ac:11:00:02 brd ff:ff:ff:ff:ff:ff
    inet 172.17.0.2/16 brd 172.17.255.255 scope global eth0
      valid_lft forever preferred_lft forever
Note
On macOS, virtual bridge networks are isolated within the Docker VM and are not visible as network interfaces. This contrasts with traditional bridge networks created on Linux.
Docker supports a specialized container network mode that enables two or more containers to share the exact same network namespace. This network mode allows several containers to share the same IP address, ports, and network configuration, and communicate using the localhost interface (127.0.0.1). While this mode is efficient for local IPC and sidecar patterns, it requires security considerations because it removes network isolation between containers.
This feature is enabled using the –network=container:<container-name> option:
$ docker run -it --rm --name=c1 busybox /bin/sh
$ docker run -it --rm --name=c2 --network=container:c1 busybox /bin/sh
$ docker inspect c1 | grep IPAddress
An overlay network connects several distributed hosts, enabling containers on different hosts to communicate. Docker’s overlay network driver uses VXLAN (Virtual Extensible LAN) to enable communication between containers on different Docker hosts. Overlay technologies, such as VXLAN, are covered in Chapter Inter-Container Communication.
The macvlan network driver allows containers to be assigned a unique MAC address, making them appear as distinct physical devices directly connected to the physical network via a sub-interface on the host’s network card. This is useful for applications that require direct access to the physical network such as network traffic monitoring tools. In this scenario, there is no need for TAP/VETH devices or a bridge. While the host mode directly shares the host’s network stack with the container (same network interface, IP address, and routing table), macvlan creates a virtual network interface, with its own MAC address, for each container.
A none network mode is used to run a container with no network interfaces. Only the loopback interface (lo) is present. This mode is useful to completely isolate the container from any external network access. It ensures that the container cannot communicate over the network with other containers or external hosts. It is particularly useful for workloads handling sensitive data (e.g., encryption/decryption, password management) to reduce the risk of data leakage.
Kubernetes commands#
Pods#
kubectl_pod_reference_table provides a quick reference table
describing the most useful kubectl commands for managing Pods:
Description |
Command |
|---|---|
Create or update a Pod |
|
List all Pods across all namespaces |
|
Show detailed information |
|
Show CPU and memory usage |
|
Execute a command in a Pod |
|
Retrieve the logs of a Pod |
|
Forward the port of a Pod to the host |
|
Copy files from container to filesystem |
|
Delete a Pod |
|
Services#
kubectl_service_reference_table provides a quick reference table, which
describes the most useful kubectl commands for managing Services:
Description |
Command |
|---|---|
Create or update a Service |
|
Expose a Deployment as a new Service |
|
List all Services in the current namespace |
|
List all Services in all namespaces |
|
Show detailed information about a Service |
|
Delete a Service |
|
Edit a Service |
|
Get the YAML for a Service |
|
Deployment#
kubectl-deployment-commands lists the most relevant kubectl commands for managing a Deployment.
Description |
Command |
|---|---|
Creates or applies a deployment |
|
Lists all deployments |
|
Shows detailed information |
|
Scales a deployment |
|
Views the rollout history |
|
Undoes the latest rollout |
|
Deletes a deployment |
|
ReplicaSet#
kubectl-replicaset-commands lists the most relevant kubectl commands for managing a ReplicaSet.
Description |
Command |
|---|---|
Lists all ReplicaSets |
|
Shows detailed information |
|
Scales a ReplicaSet |
|
Creates an autoscaler |
|
StatefulSet#
kubectl-statefulset-commands lists the most relevant kubectl commands for managing a StatefulSet.
Description |
Command |
|---|---|
Create/update a StatefulSet |
|
Lists all StatefulSets |
|
Shows detailed information |
|
Scales the number of replicas |
|
Edit the configuration |
|
Deletes a StatefulSet |
|
Network troubleshooting#
This section provides a breakdown of the Linux network stack and its associated diagnostic tools, serving as a reference for troubleshooting networking issues in Linux and Kubernetes environments throughout this book.
Network stack#
The Linux network stack is composed of multiple layers responsible for network communication from the hardware interface level up to the application level.
linux-ip-stack-layers provides an overview of each layer.
Layer |
Description |
|---|---|
NIC / Driver |
Packet reception and transmission over the physical network |
Traffic Control |
Manages incoming and outgoing traffic |
IP |
Packet routing and forwarding |
Transport |
Connection management |
Socket |
Interface for application data transmission |
Application |
Sending and receiving data to and from remote hosts |
The Network Interface Card (NIC) and Driver layer receive packets from the physical network and transfer them to the kernel’s networking stack. Programmatically, XDP (eXpress Data Path) can access the NIC driver and process packets as soon as they reach the NIC. It can drop, pass, or redirect packets with low latency. This technology has been used for packet filtering, packet forwarding, DDoS prevention, and load balancing.
The Traffic Control (TC) Layer manages ingress (incoming) and egress (outgoing) traffic at the network interface. It can process packets before they reach the IP layer and before they leave the host. Adding logic to this layer is useful for packet filtering, rate limiting, bandwidth control, and observability.
The IP Layer is responsible for packet routing and forwarding, routing packets to the correct interface when they are addressed to other destinations. This layer allows for policy-based filtering, routing, and forwarding based on IP properties.
The Transport Layer manages transport protocols, such as TCP and UDP. For connection-oriented protocols like TCP, management tasks include connection establishment, data reassembly, and congestion control. Adding logic to this layer allows observation or modification of TCP/UDP behavior, connection tracking, and the creation of custom congestion control protocols.
The Socket Layer is the interface between the application layer and the transport layer. It is responsible for socket operations such as opening, binding, sending, and receiving data. Access to this layer enables observation or modification of application data for load balancing, access control, and filtering.
Applications (e.g., web servers, databases) at the Application layer interact with the network through sockets, sending and receiving data to and from remote hosts.
Tools#
The following table lists the main tools which can be used for troubleshooting networking problems in Linux.
Area |
Tool |
Layer |
OSI Layer Name |
|---|---|---|---|
Link Layers |
arp, ip neighbor |
2 |
Data Link |
Traffic Analysis |
tcpdump, wireshark |
2-7 |
Link to Application |
Connectivity |
ping, traceroute, ip route |
3 |
Network |
Firewalling & NAT |
iptables |
3-4 |
Network/Transport |
Listening Services |
ss, netstat |
4 |
Transport |
Port Scanning |
nmap |
4 |
Transport |
Service Testing |
telnet, nc (netcat) |
4,7 |
Transport/Application |
DNS Resolution |
dig, nslookup |
7 |
Application |
Web/API (HTTP/S) |
curl, wget, openssl |
7 |
Application |